Eos Rebel T6 Automatically Upload to Web Service
Canon iMAGE GATEWAY is an online photograph service bachelor to those who accept purchased Canon cameras.
Images can be sent to social network services and other Web services via CANON epitome GATEWAY. You lot can also share images in an online photo album. Unsent images on the camera tin can also be sent automatically to a calculator or Spider web service via CANON paradigm GATEWAY.
To use CANON iMAGE GATEWAY, delight complete the necessary camera and spider web service settings in advance using the cameras Wi-Fi office. The procedure for sending images to web services later on connecting the camera to a computer via W-Fi, and making the necessary Catechism paradigm GATEWAY settings is explained in the sections below.
CAUTION
- An Internet connexion is required to admission CANON iMAGE GATEWAY (an Cyberspace browser must be installed on the computer, you must accept an account with an Internet service provider, and an Net connection must be established).
- A dedicated awarding must be downloaded to Catechism image GATEWAY on a smartphone or tablet device. For more than information, please refer to the CANON image GATEWAY Web site.
IMPORTANT
- Bank check CANON iMAGE GATEWAY for browser (Microsoft Net Explorer, etc.) settings, conditions and version information when connecting to CANON prototype GATEWAY.
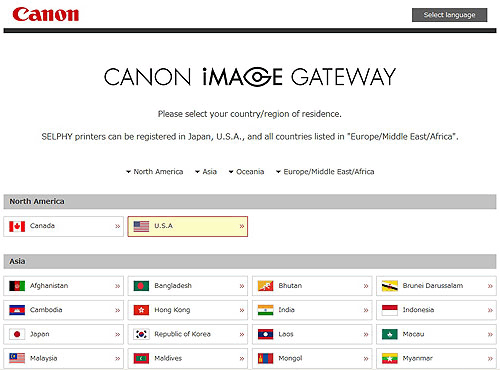
- For information on countries and regions where Canon iMAGE GATEWAY is available, visit the Canon website (http://www.catechism.com/cig/).
- You lot must take an account with Web services other than Catechism epitome GATEWAY if yous desire to apply them. For farther details, check the websites for each Spider web service y'all want to annals.
- Split ISP connection and access point fees may be applicable.
- The data appearing in this explanation with regards to CANON prototype GATEWAY is based on current specifications (Jan 1, 2014). Some details may vary depending on when y'all access Catechism iMAGE GATEWAY.
NOTE
Computer setting procedures are indicated by the
icon.
Camera setting procedures are indicated by the
icon.
Adjusting Settings for Using Web Services from CANON paradigm GATEWAY
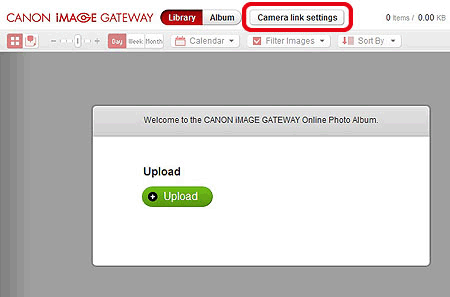
1. From a calculator or smartphone, access http://www.canon.com/cig/ and visit the CANON iMAGE GATEWAY site for your region.
two. One time the login screen is displayed, enter your user name and password to log in. If y'all practise non take a CANON prototype GATEWAY account, follow the instructions to consummate fellow member registration (free of charge).
3. Click [Camera link settings].
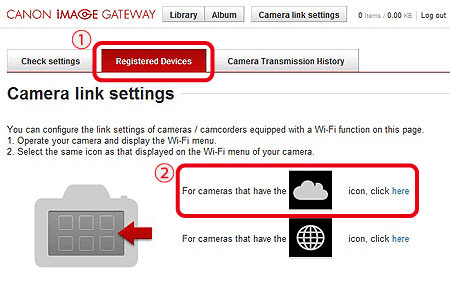
4. Click the [Registered Devices] tab on the screen displayed, and then click the [For cameras that have the  icon displayed, click here] carte du jour choice.
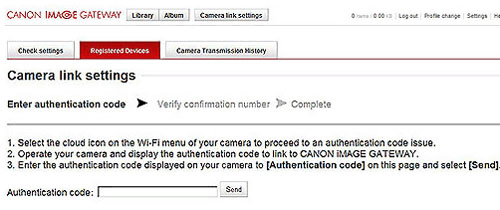
five. The [Authentication code] entry screen for [Camera link settings] will exist displayed.
The hallmark lawmaking will be displayed on the photographic camera screen after the subsequent steps are completed. Delight leave the screen open.
6. Printing the <Playback> ( ) button to turn the camera on.
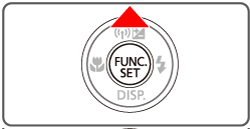
7. Press the <Wi-Fi> ( ) button.
Notation
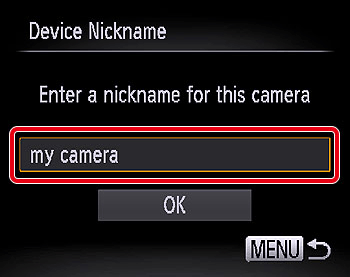
When setting up Wi-Fi for the offset fourth dimension, the camera nickname registration screen will be displayed. This nickname will exist displayed on the screen of target devices when connecting to other devices via Wi-Fi.
Press the <
> button to access the keyboard, and then enter a nickname
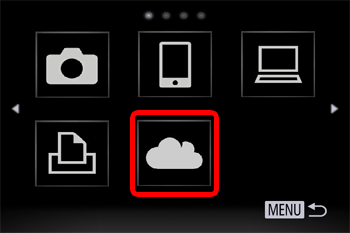
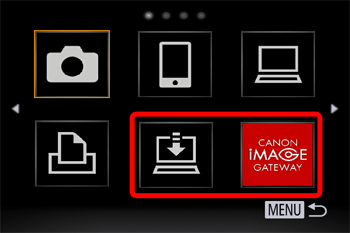
eight. Display the cameras Wi-Fi carte du jour.
Printing the < ><
>< ><
>< ><
><  > keys or turn the <
 > dial to choose , and then press the <> button.
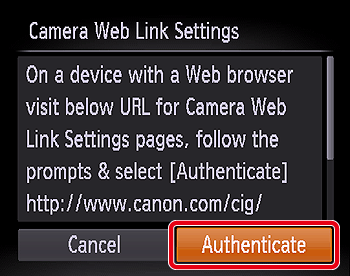
nine. Establish a connection with an access betoken.
Press the <><> buttons or plow the <> dial to choose [Authenticate], so press the <> button.
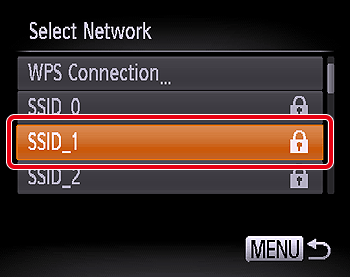
10. Choose an access signal.
Press the <><> buttons or turn the <> dial to choose a network (access point), then printing the <> push button.
NOTE
xi. Enter the access betoken password.
 Press the <> push to access the keyboard, and so enter the countersign
 Printing the < ><> buttons or plough the < > dial to choose [Next], so press the < > push.

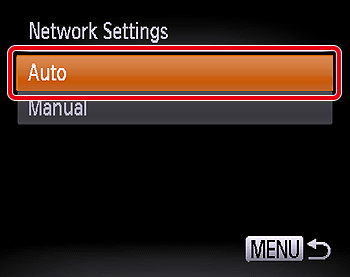
12. Choose [Auto] and establish the connexion.
Printing the < ><> buttons or turn the < > punch to choose [Car], and and then press the < > push button.
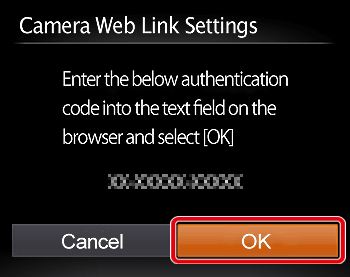
13. Once the camera is connected to Catechism epitome GATEWAY via the access point, an authentication code is displayed.
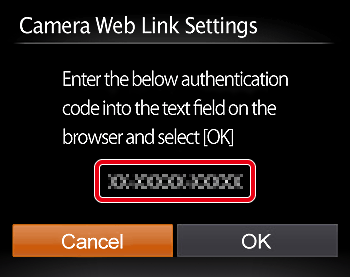
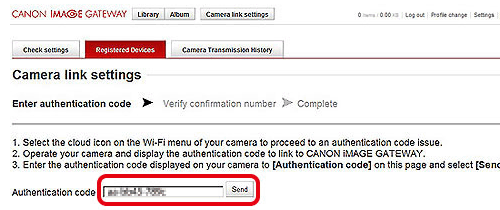
xiv. On the computer, enter the authentication code displayed on the camera and click the ship button.
15. Press the <>< > buttons or turn the <> punch to choose [OK], and so press the <> button.
16. A six-digit confirmation number is displayed on the calculator.
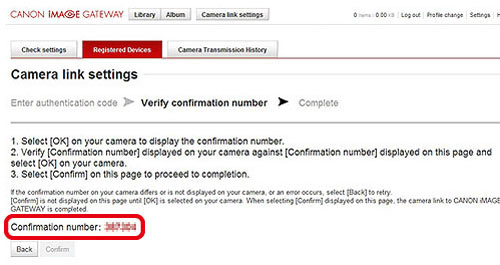
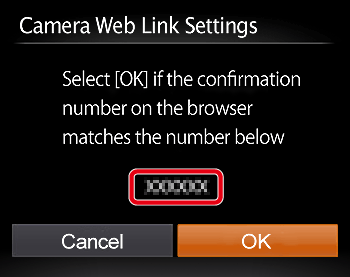
17. A confirmation number is also displayed on the camera.
Brand sure the confirmation number on the photographic camera matches the number on the reckoner, and then press the <> button.
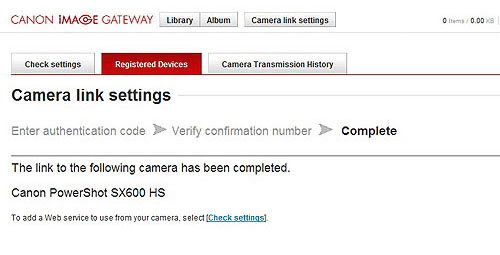
eighteen. Click [Ostend] on the calculator.
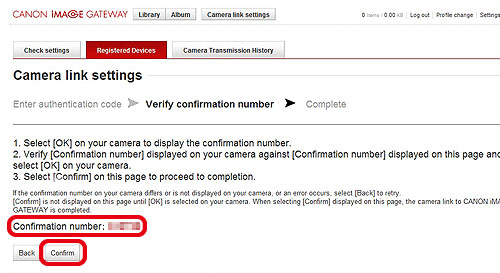
19. The [Complete] screen will be displayed on the computer.
twenty. The photographic camera display will return to the Wi-Fi carte, and the [  ] icon changes to [
  ].
].
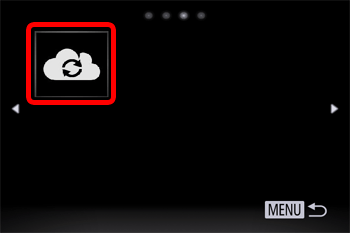
21. Press the < > button or plow the < > dial. [  ] and the Catechism epitome GATEWAY icon will be added.
Yous can also add together other web services. For more than information, please refer to the 'Registering Other Spider web Services' department below.
Registering Other Web Services
Y'all can also add Web services besides Canon iMAGE GATEWAY to the camera.
one. On the computer, click the [Bank check settings] tab to display a list of Spider web services that can be used.
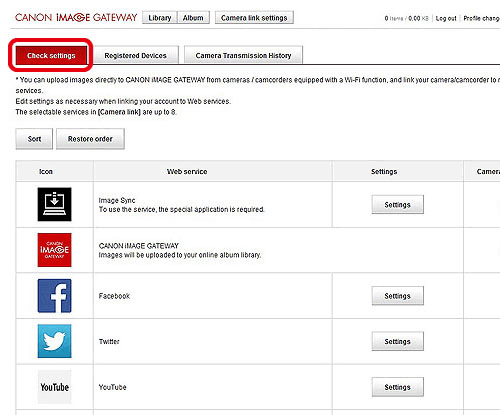
2. Configure the Spider web service you lot desire to use.
Follow the instructions displayed on the computer to set the Web service.
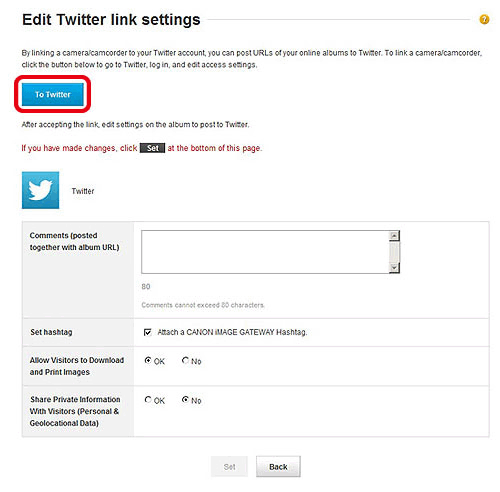
The explanation for making settings to utilize Twitter is explained below. To use Twitter, click the [Settings] push button actualization in the [Settings] column located in the same row as the Twitter icon. The screen beneath volition be displayed. Next, please click [To Twitter] to login to Twitter and perform the necessary access settings.
3. If  appears in the [Photographic camera links] in the aforementioned row as the Twitter icon, please click it.
4. Follow the steps displayed on the screen to display  in [Camera links] in the same row equally the Twitter icon. At this bespeak, the [Photographic camera link settings] for Twitter will be complete.
5. On the cameras Wi-Fi bill of fare, choose  so press the <> push button to update the Web service settings.
-If any configured settings alter, follow these steps once more to update the camera settings.
6. A screen like the following 1 will be displayed and the Web service settings will be updated.
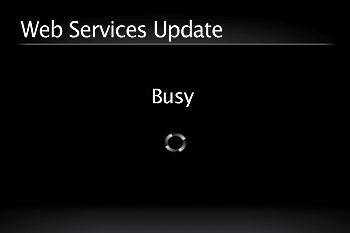
vii. After the update process is complete and a connection to the network is made, the Twitter icon will be displayed on the screen.
This concludes the setting process.
Annotation
To add additional Spider web services, or change the settings, please repeat the process from step 1.
Connecting to a Spider web Service and Sending Images
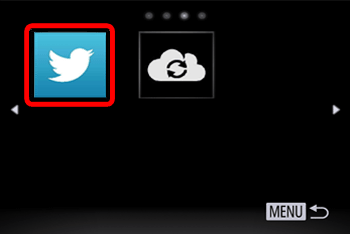
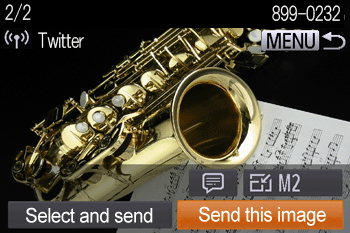
1. Choose the desired Web service. In this example, the procedures are shown for Twitter.
Press the <> <> <> <> buttons to choose the desired Spider web services icon, and so press the <> button.
NOTE
two. The following screen will exist displayed.
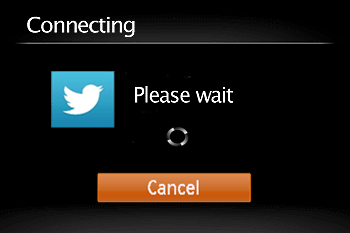
3. When the connection is made, the screen for sending images will appear. To send the epitome shown, choose [Send this image] and and so press the <> push.
To send multiple images, press the < ><> buttons to choose [Select and send], so press the < > button to select the desired images.
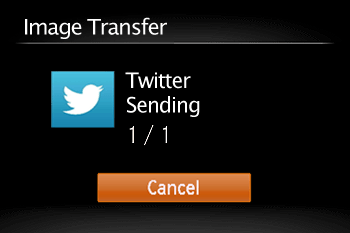
4. The [Prototype Transfer] screen will appear when images are sent.
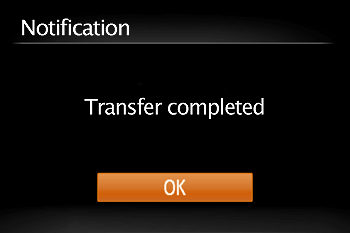
5. Later the images have been send, the screen beneath will be displayed. Press the <> push button to cease the connexion.
This concludes the caption of the procedure for sending images.
NOTE
Source: https://support.usa.canon.com/kb/index?page=content&id=ART116886
0 Response to "Eos Rebel T6 Automatically Upload to Web Service"
Post a Comment